
The TCPProxy
The TCPProxy is a proxy process that you can place in a TCP
stream, such as the HTTP connection between your browser and a
server. It filters the request and response streams, sending the
results to the terminal window (stdout). You can
control its behaviour by specifying different filters.
The TCPProxy's main purpose is to automatically generate HTTP test scripts that can be replayed with The Grinder's HTTP plugin. Because the TCPProxy lets you see what's going on at a network level it is also very useful as a debugging tool in its own right.
Starting the TCPProxy
You start the TCPProxy with something like:
CLASSPATH=/opt/grinder/lib/grinder.jar
export CLASSPATH

java net.grinder.TCPProxy
Say java net.grinder.TCPProxy -? to get a full
list of the command line options.
With no additional options, the TCPProxy will start and display the following information:
Initialising as an HTTP/HTTPS proxy with the parameters:
   Request filters:  EchoFilter
   Response filters: EchoFilter
   Local address:    localhost:8001
Engine initialised, listening on port 8001
This indicates that the TCPProxy is listening as an HTTP proxy
on port 8001 (the default, but you can change it with
-localPort).
The TCPProxy appears to your browser just like any other HTTP
proxy server, and you can use your browser as normal. If you type
http://grinder.sourceforge.net into your browser it
will display The Grinder home page and the TCPProxy will output
all of the HTTP interactions between the browser and the
SourceForge site.
The TCPProxy will proxy both HTTP and HTTPS. See below for details on customising the SSL configuration.
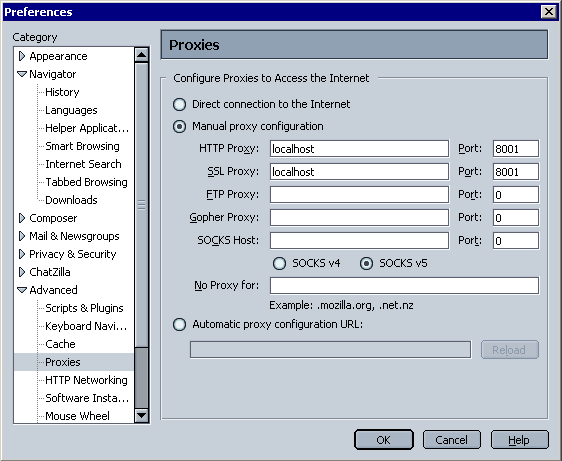
Preparing the Browser
You should now set your browser connection
settings to specify the TCPProxy as the HTTP proxy. In the browser
options dialog, set the proxy host to be the host on which the
TCPProxy is running and proxy port to be 8001).
The relevant options dialog can be accessed by the following steps:
MSIE: Tools -> Internet Options -> Connections -> Local Area Network Settings.
Mozilla/Netscape: Edit -> Preferences -> Advanced - Proxies.
Mozilla/Firefox: Tools -> Options -> General -> Connection Settings.
Opera: Tools -> Preferences -> Advanced -> Network -> Proxy Servers.
It is important to remember to remove any "bypass proxy server" or "No Proxy for" settings that you might have so that all the traffic flows through the TCPProxy and can be captured.
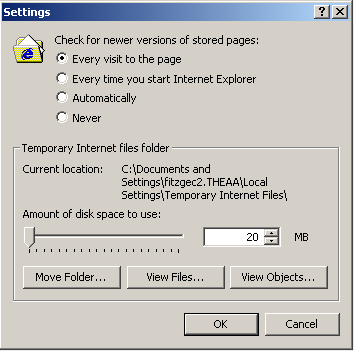
It might also be a good idea to clear out any cache/temporary Internet files that might be on your workstation. On the other hand, you might decide not to do this if you want to record a script representing a frequent user to your site who has images are resources in their browser cache. Also for IE users, changing the temporary Internet files settings to check for a newer version on every visit to a page can be useful.
Using the EchoFilter
The EchoFilter is the default filter used by the TCPProxy if no options are specified in the startup command. The EchoFilter outputs the stream activity to the terminal. It can be very useful for debugging as described in this FAQ.
Bytes that do not have a printable ASCII representation are displayed in hexadecimal between square brackets. Here's some example output:
------ 127.0.0.1:2263->ads.osdn.com:80 ------
GET /?ad_id=5839&alloc_id=12703&site_id=2&request_id=8320720&1102173982760 HTTP/1.1
Host: ads.osdn.com
User-Agent: Mozilla/5.0 (Windows; U; Windows NT 5.0; en-US; rv:1.7.5) Gecko/20041107 Firefox/1.0
Accept: image/png,*/*;q=0.5
Accept-Language: en-gb,en-us;q=0.7,en;q=0.3
Accept-Encoding: gzip,deflate
Accept-Charset: ISO-8859-1,utf-8;q=0.7,*;q=0.7
Keep-Alive: 300
Proxy-Connection: keep-alive
Referer: http://sourceforge.net/projects/grinder


--- ads.osdn.com:80->127.0.0.1:2263 opened --
------ ads.osdn.com:80->127.0.0.1:2273 ------
HTTP/1.1 200 OK
Date: Sat, 04 Dec 2004 15:26:27 GMT
Server: Apache/1.3.29 (Unix) mod_gzip/1.3.26.1a mod_perl/1.29
Pragma: no-cache
Cache-control: private
Connection: close
Transfer-Encoding: chunked
Content-Type: image/gif


------ ads.osdn.com:80->127.0.0.1:2273 ------
80B
GIF89ae[00])[00D50000C3C3C3FEFDFD]hhhVVVyyy[F5CCD2D4D4D4CBCBCBD7]'F
Information lines are displayed to indicate the end point addresses and direction of the information flow and also whether a connection has just been opened or closed.
Using the HTTP TCPProxy filters
You can use the TCPProxy to generate an HTTP script
suitable for use with The Grinder. The Grinder provides a pair
of HTTP filters for this purpose. These filters are enabled by the
-http command line option.
The first step is to start the TCPProxy with an HTTP filter:
java net.grinder.TCPProxy -console -http > grinder.py
The > grinder.py part of the line sends the script to a
file called grinder.py.
The terminal output of the TCPProxy looks like:
14/03/06 17:04:25 (tcpproxy): Initialising as an HTTP/HTTPS proxy with the
parameters:
   Request filters:    HTTPRequestFilter
   Response filters:   HTTPResponseFilter
   Local address:      localhost:8001
14/03/06 17:04:27 (tcpproxy): Engine initialised, listening on port 8001
The console (initiated by -console) displays a simple control window that allows the TCPProxy to be shut down cleanly. This is needed because some terminal shells, e.g. Cygwin bash, do not allow Java processes to be interrupted cleanly, so filters cannot rely on standard shut down hooks. The console also allows a user to add ad-hoc commentary to the script during the recording. The console looks like this:

The TCPProxy console will be incorporated into the main console in a future release.
Set your browser to use the TCPProxy as the HTTP proxy as described earlier), and run through your test scenario on your website.
Having finished your run through, press "Stop" on the TCPProxy
console and the generated script will be written to grinder.py.
The grinder.py file contains headers, requests and
a logical grouping of requests into pages, of the recorded tests.
For example, the headers section:
# The Grinder 3.13-SNAPSHOT
# HTTP script recorded by TCPProxy at 05-Jul-2012 09:20:55

from net.grinder.script import Test
from net.grinder.script.Grinder import grinder
from net.grinder.plugin.http import HTTPPluginControl, HTTPRequest
from HTTPClient import NVPair
connectionDefaults = HTTPPluginControl.getConnectionDefaults()
httpUtilities = HTTPPluginControl.getHTTPUtilities()

# To use a proxy server, uncomment the next line and set the host and port.
# connectionDefaults.setProxyServer("localhost", 8001)

def createRequest(test, url, headers=None):
    """Create an instrumented HTTPRequest."""
    request = HTTPRequest(url=url)
    if headers: request.headers=headers
    test.record(request, HTTPRequest.getHttpMethodFilter())
    return request

# These definitions at the top level of the file are evaluated once,
# when the worker process is started.

connectionDefaults.defaultHeaders = \
  [ NVPair('Accept-Encoding', 'gzip, deflate'),
    NVPair('Accept-Language', 'en-gb,en;q=0.5'),
    NVPair('Cache-Control', 'no-cache'),
    NVPair('User-Agent', 'Mozilla/5.0 (X11; Ubuntu; Linux x86_64; rv:13.0) Gecko/20100101 Firefox/13.0.1'), ]

headers0= \
  [ NVPair('Accept', 'text/css,*/*;q=0.1'),
    NVPair('Referer', 'http://grinder.sourceforge.net/'), ]

headers1= \
  [ NVPair('Accept', '*/*'),
    NVPair('Referer', 'http://grinder.sourceforge.net/'), ]

headers2= \
  [ NVPair('Accept', 'image/png,image/*;q=0.8,*/*;q=0.5'),
    NVPair('Referer', 'http://grinder.sourceforge.net/'), ]

headers3= \
  [ NVPair('Accept', 'image/png,image/*;q=0.8,*/*;q=0.5'),
    NVPair('Referer', 'http://grinder.sourceforge.net/skin/screen.css'), ]

headers4= \
  [ NVPair('Accept', 'image/png,image/*;q=0.8,*/*;q=0.5'),
    NVPair('Referer', 'http://grinder.sourceforge.net/skin/profile.css'), ]

#....
In the requests section, a request object for each unique URL is created:
url0 = 'http://grinder.sourceforge.net:80'
url1 = 'http://www.ohloh.net:80'
url2 = 'http://sourceforge.net:80'

request101 = createRequest(Test(101, 'GET /'), url0)

request102 = createRequest(Test(102, 'GET profile.css'), url0, headers0)

request103 = createRequest(Test(103, 'GET screen.css'), url0, headers0)

request104 = createRequest(Test(104, 'GET print.css'), url0, headers0)

# ...
Note the use of the createRequest helper function,
which was defined earlier. This function creates a
HTTPRequest object and instruments its
GET, POST, ..., methods to report
call statistics against the supplied Test.
Finally the TestRunner class. This section groups the requests into pages and defines each page as a method, sets the sleep interval between requests, and provides an instrumented method for the return of data from the tests:
  # A method for each recorded page.
  def page1(self):
    """GET / (requests 101-131)."""
    result = request101.GET('/', None,
      ( NVPair('Accept', 'text/html,application/xhtml+xml,application/xml;q=0.9,*/*;q=0.8'), ))
    self.token_subject = \
      httpUtilities.valueFromBodyURI('subject') # 'Feedback on The Grinder web site index.h...'
    self.token_sitesearch = \
      httpUtilities.valueFromHiddenInput('sitesearch') # 'grinder.sourceforge.net'

    grinder.sleep(176)
    request102.GET('/skin/profile.css')

    request103.GET('/skin/screen.css')

    request104.GET('/skin/print.css')

    request105.GET('/skin/basic.css')

#.....

    return result

  def page2(self):

#.....

  def __call__(self):
    """Called for every run performed by the worker thread."""
    self.page1()      # GET / (requests 101-131)

    grinder.sleep(39)
    self.page2()      # GET project_users.js (requests 201-202)
    self.page3()      # GET pdfdoc.gif (requests 301-305)
    self.page4()      # GET sflogo.php (request 401)
    self.page5()      # GET external-link.gif (request 501)


# Instrument page methods.
Test(100, 'Page 1').record(TestRunner.page1)
Test(200, 'Page 2').record(TestRunner.page2)

#.....
Once you've recorded your script you have two methods that you can use to replay your script:
- You can create a simple
grinder.propertiesfile and you can replay the recorded scenario with The Grinder. Your properties file should at least setgrinder.scripttogrinder.py. - Alternately you can use the console to distribute your script to an
agent and set it as the script to run. Each agent will still
need a simple
grinder.propertiesfile containing the console address, though you will not need to set thegrinder.scriptproperty.
The recorded script grinder.py can be edited by hand to suit your needs.
Generating a Clojure script
You can generate a Clojure script using -http
clojure on the command line. For example:
java net.grinder.TCPProxy -http clojure -console
Altering the output with custom stylesheet
The TCPProxy HTTP filters installed with
-http, -http jython, and -http
clojure, each create their output by transforming an XML
model of the HTTP request/response stream using an XLST
stylesheet.
These standard stylesheets can be found in etc. You
can use a stylesheet of of your own making to customise the output
of the filter. You should pass the file name of your custom
stylesheet as a command line argument directly after
-http.
If you want to see the intermediate XML model you can use:
java net.grinder.TCPProxy -http etc/httpToXML.xsl -console
The model confirms to the XML schema etc/tcpproxy-http.xsd.
How to offset test numbers
If sometimes useful to offset test numbers for a test script when running several different scripts together, perhaps using the sequence, or parallel examples from the script gallery. This gives the tests contributed by each script a distinct range of test numbers, which is important because the test number uniquely identifies the test in the console and the data logs.
The HTTP TCPProxy filter allows the recording of a test script with
off-setting test numbers. This is done using the
HTTPPlugin.initialTest property, which can either be set
directly on the command line, or in a file using the
-properties option. Here's an example that will start the
test numbers at 1000:
java -DHTTPPlugin.initialTest=1000 net.grinder.TCPProxy -http
Its also simple to offset test values by modifying the script.
Edit the recorded script to replace:
from net.grinder.script import Test
with:
from net.grinder.script import Test as StandardTest

def Test(number, description):
    # Adjust the 1000 to the appropriate offset.
    return StandardTest(number + 1000, description)
Neither technique allows different test scripts to be merged together into one because you also have to alter the identifiers used for headers, URLs, pages, tokens, and so on. If you want to do this, you might consider a custom stylesheet.
How to record additional headers
By default, the following HTTP headers are recorded from the HTTP stream.
- Accept
- Accept-Charset
- Accept-Encoding
- Accept-Language
- Cache-Control
- Referer
- User-Agent
- Content-Type
- If-Modified-Since
- If-None-Match
Additional headers can be specified with the
HTTPPlugin.additionalHeaders system property. The
value is a comma-separated list of header names. For example:
java net.grinder.TCPProxy -DHTTPPlugin.additionalHeaders=MyHeader,AnotherHeaderName -http
SSL and HTTPS support
The TCPProxy has SSL support based on Java's JSSE framework.
SSL relationships are necessarily point to point. When you interpose the TCPProxy in SSL communications between a browser and a server you end up with two SSL connections. Each SSL connection has its own set of client and server certificates (both of which are optional).
The TCPProxy will negotiate appropriate certificates for both connections using built-in certificates or those from a user-specified Java key store. In particular, the TCPProxy needs a self-signed server certificate for the connection from the browser. By default, the TCPProxy will use a built-in certificate.
When first establishing a connection, your browser will present
a warning and confirmation dialog. This is because the built-in
certificate isn't authorised by any of the certificate authorities
that the browser trusts. Additionally, the built-in certificate
authorises localhost so if your server doesn't
listen at this address the browser will complain. Choose the
"accept this certificate for this session" option.
Advanced users can specify their own server certificate for the
connection from the browser, or add client certificates for the
connection to the server, using the -keystore,
-keystorepassword, and -keystoretype
options. See the J2SE/JSSE documentation for how to set up a key
store.
If you fail to provide a key store with a valid server certificate (hard to do now The Grinder has a built in certificate), you may get a No available certificate corresponds to the SSL cipher suites which are enabled exception, and your browser may report that it cannot communicate as it has no common encryption algorithms. Internet Explorer likes to be different. If start the TCPProxy without a valid server certificate and then connect through it using Internet Explorer, the TCPProxy will report "SSL peer shut down incorrectly. The browser will just spin away until it times out. The easiest way to provide a server certificate is to copy the testkeys file from the JSSE samples distribution and start the proxy using:
java net.grinder.TCPProxy -keyStore testkeys -keyStorePassword passphrase
Using the TCPProxy with other proxies
The TCPProxy can be used with other HTTP/HTTPS proxies.
Use the -httpproxy option to specify the host name
and port of the proxy. Use the -httpsproxy option
only if your HTTPS proxy requires separate settings.
Using the TCPProxy as a port forwarder
It is normally most useful to use the TCPProxy in its HTTP Proxy mode as described above.
When using the TCPProxy as a debugging tool it occasionally is
useful to use it in port forwarding mode. This mode is
enabled when one or more of -remotehost and
-remoteport are specified. In port forwarding mode,
the TCPProxy simply listens on localhost:localport
and forwards to remotehost:remoteport.
To understand why HTTP Proxy mode is usually better than port forwarding mode when using a browser, consider what happens if the remote server returns a page with an absolute URL link back to itself. If you click on the link, the browser will contact the server directly, bypassing the TCPProxy. Another disadvantage is that you can't use the TCPProxy with more than one remote sever.
Summary of TCPProxy options
| Option | Description |
|---|---|
| Commonly used options | |
-console |
Display a simple console that has a control button that allows The TCPProxy to be shut down cleanly. This can help in certain situations where a hard kill of the TCPProxy process would lose output that is still buffered in memory. |
-http [stylesheet] |
Adds a standard request filter and response filter to
produce a Jython script for The Grinder suitable for use with
the HTTP plugin. The default filter generates a Jython script
and is equivalent to -http jython. Alternatively,
use clojure to produce a Clojure script, or the
output can be customised completely by providing the file name
of an XSLT style sheet. |
-requestfilter filter |
Add a request filter. filter can be the name of
a class that implements
net.grinder.tools.tcpproxy.TCPProxyFilter or one of
NONE, ECHO. The option can be
specified multiple times, in which case the filters are invoked
one after another. If the not specified, the default
ECHO filter is used. |
-responsefilter filter |
Add a response filter. filter can be the name
of a class that implements
net.grinder.tools.tcpproxy.TCPProxyFilter or one of
NONE, ECHO. The option can be
specified multiple times, in which case the filters are invoked
one after another. If the not specified, the default
ECHO filter is used. |
-localhost host |
Set the host name or IP address to listen on. This must
correspond to an interface of the machine the TCPProxy is
started on. The default is localhost. |
-localport port |
Set the port to listen on. The default is
8001. |
-keystore file |
Specify a custom key store. Usually the built-in keystore is
good enough so -keystore does not need to be
specified. |
-keystorepassword password |
Set the key store password. Only used if
-keystore is set. Optional for some key store
types. |
-keystoretype type |
Set the key store type. Only used if -keystore
is set. If not specified, the default value depends on JSSE
configuration but is usually jks. |
| Less frequently used options | |
-properties file |
Specify a file containing properties that are passed on to the filters. |
-remotehost host |
Set the host name or port the TCPProxy should connect to in
port forwarding mode. The
TCPProxy starts in port forwarding mode if either
-remotehost or -remoteport is set. The
default is localhost. |
-remoteport port |
Set the port the TCPProxy should connect to in port forwarding mode. The
TCPProxy starts in port forwarding mode if either
-remotehost or -remoteport is set. The
default is 7001. |
-timeout seconds |
Set an idle timeout. This is how long the TCPProxy will wait for a request before timing out and freeing the local port. The TCPProxy will not time out if there are active connections. |
-httpproxy host port |
Specify that output should be directed through another HTTP/HTTPS proxy. This may help you reach the Internet. This option is not supported in port forwarding mode. |
-httpsproxy host port |
Specify that output should be directed through a HTTPS
proxy. Overrides any -httpproxy setting. This
option is not supported in port
forwarding mode. |
-ssl |
Use SSL in port forwarding mode. This will make both the TCPProxy's local socket and the connections to the target server use SSL. The default HTTP Proxy mode ignores this option and always listens as an HTTP proxy and an HTTPS proxy. |
-colour |
Specify that a simple colour scheme should be used to distinguish request streams from response schemes. This uses terminal control codes that only work on ANSI compliant terminals. |
-component class |
Register a component class with the filter PicoContainer. |
-debug |
Make PicoContainer chatty. |